Introduction
Resin art is a creative craft using epoxy resin to make beautiful, glossy artworks. It’s popular for its vibrant colors and the ability to embed various objects. Here’s a simple guide to get you started.
What You Need
- Epoxy Resin and Hardener: The main ingredients.
- Measuring Cups and Sticks: For mixing.
- Protective Gear: Gloves, masks, and aprons.
- Heat Gun or Torch: To remove air bubbles.
- Silicone Molds: For shaping the resin.
- Pigments and Additives: For color and texture.
- Surface Protection: To keep your workspace clean.
Basic Steps
- Prepare:
- Work in a well-ventilated area.
- Wear protective gear and cover your workspace.
- Mix:
- Measure and mix the resin and hardener as per instructions.
- Stir thoroughly for 2-3 minutes.
- Color:
- Divide the resin into separate cups.
- Add pigments or dyes and stir well.
- Add glitter or other embellishments if desired.
- Pour:
- Pour the resin into molds or onto your chosen surface.
- Use a heat gun or torch to remove air bubbles.
- Cure:
- Let the resin cure for 24-72 hours in a dust-free area.
- Finish:
- Once cured, remove from molds and add any final touches like sanding or polishing.
Tips
- Start Small: Try small projects first.
- Measure Accurately: Follow the instructions for best results.
- Keep Clean: A tidy workspace prevents contamination.
- Stay Safe: Use protective gear and work in a ventilated area.
- Experiment: Try different colors, layers, and additives for unique effects.
1. Understanding Resin Art: A Quick Guide
What is Resin?
Epoxy resin is a liquid material that, when mixed with a hardener, turns into a solid, glass-like finish. It’s durable and can be colored and molded into various shapes.
Key Features
- Glossy Finish: Resin cures to a shiny, professional-looking surface.
- Durable: Once hardened, it’s strong and resistant to damage.
- Versatile: Can be used on surfaces like canvas, wood, and molds.
Popular Uses
- Paintings: Create abstract art with swirling colors.
- Jewelry: Make pendants, earrings, and rings by embedding small objects.
- Functional Items: Design coasters, trays, and tabletops.
- Decorative Objects: Craft unique sculptures and bowls.
Basic Techniques
- Pouring: Pour resin onto surfaces or into molds to create different effects.
- Layering: Add colors and elements in layers for depth.
- Embedding: Include objects like shells or flowers within the resin.
- Color Mixing: Use pigments and dyes to achieve vibrant colors.
Why Try Resin Art?
- Creative Freedom: Experiment with colors and textures.
- Unique Results: Each piece is one-of-a-kind.
- Relaxing: The process is both fun and calming.

2. Essential Techniques in Resin Art
1. Pouring
Description: Pouring resin is the first step in creating resin art. You pour the liquid resin onto a surface or into a mold to create different shapes and patterns.
- Direct Pour: Pour resin straight onto your canvas or surface.
- Dirty Pour: Mix several colors in one cup and pour them together for marbled effects.
Tips:
- Pour slowly for better control.
- Ensure your surface is flat for even spreading.
2. Layering
Description: Layering involves adding resin in stages. You let each layer cure before adding the next to build depth.
- Creating Depth: Add different colors and objects in each layer for a 3D effect.
- Layered Colors: Pour different colors in layers to keep them distinct.
Tips:
- Let each layer cure properly to prevent mixing.
- Use clear and colored layers for more depth.
3. Embedding
Description: Embedding is placing objects within the resin to make your artwork more interesting.
- Inclusions: Embed items like flowers, glitter, or stones.
- Floating Objects: Place objects at different levels to make them look like they’re floating.
Tips:
- Clean and dry objects before embedding.
- Use a bit of resin to hold lightweight items in place.
4. Color Mixing
Description: Add pigments, dyes, or inks to your resin to get various colors.
- Solid Colors: Use opaque pigments for bright, solid colors.
- Transparent Effects: Use dyes for see-through layers.
- Swirls: Mix colors gently to create swirled patterns.
Tips:
- Add color gradually to get the right shade.
- Stir well to avoid streaks.
5. Heat Manipulation
Description: Use heat to remove air bubbles and shape the resin.
- Heat Gun or Torch: Move a heat gun or torch over the resin to pop bubbles and move the resin.
- Heat Lamps: Keep resin at the right temperature for smooth flow and curing.
Tips:
- Keep the heat source moving to avoid burning the resin.
- Work in a well-ventilated area.
6. Texturing
Description: Add texture to your resin for extra visual interest.
- Tools: Use brushes, combs, or other tools to create patterns.
- Additives: Mix in materials like sand, glitter, or mica powder.
Tips:
- Experiment with different tools for unique textures.
- Apply textures while the resin is still wet.

3. Tools and Materials
1. Epoxy Resin and Hardener: The Basics
Description: The main ingredients of resin art. When mixed together, they harden into a shiny, glass-like surface.
- Tips:
- Follow the mixing instructions on the package.
- Mix thoroughly to avoid bubbles and ensure proper hardening.
2. Measuring Cups and Mixing Sticks
Description: Essential for measuring and mixing the resin and hardener.
- Tips:
- Use disposable or reusable cups with measurement markings.
- Stir with wooden or silicone sticks for an even mix.
3. Protective Gear
Description: Protect yourself while working with resin.
- Items:
- Gloves: Nitrile gloves to protect your hands.
- Mask: A respirator mask to protect against fumes.
- Apron: To keep your clothes clean.
4. Heat Gun or Torch
Description: Used to remove air bubbles from the resin and help it spread evenly.
- Tips:
- Move the heat gun or torch continuously to avoid burning the resin.
- Work in a well-ventilated area.
5. Silicone Molds
Description: Flexible molds for shaping resin into coasters, jewelry, and other items.
- Tips:
- Make sure molds are clean and dry before use.
- Use a mold release spray if needed for easy removal.
6. Pigments and Additives
Description: Add color and sparkle to your resin art.
- Types:
- Pigments: For solid, opaque colors.
- Dyes: For transparent, tinted colors.
- Inks: Alcohol inks for vibrant, fluid patterns.
- Glitter: To add sparkle.
- Mica Powder: For shimmer and metallic effects.
7. Mixing Containers
Description: Containers for mixing resin with colors and additives.
- Tips:
- Use silicone or plastic containers for easy cleaning.
- Use separate containers for different colors to avoid mixing.
8. Drop Cloths and Protective Coverings
Description: Protect your workspace from spills and drips.
- Tips:
- Cover your work area with plastic sheeting or drop cloths.
- Wear old clothes or an apron to keep yourself clean.
9. Leveling Surface
Description: Ensure your workspace is level to prevent resin from pooling or spilling.
- Tips:
- Use a level tool to check your work surface before pouring resin.
10. Spatulas and Brushes
Description: Tools for spreading and manipulating resin.
- Types:
- Silicone Spatulas: For spreading resin evenly.
- Brushes: For detailed work and adding textures.
11. Cleaning Supplies
Description: Keep your tools and workspace clean.
- Items:
- Isopropyl Alcohol: For cleaning resin from tools and surfaces.
- Paper Towels: For wiping up spills and cleaning as you go.


4. Current Trends in Resin Art
1. Geode and Crystal Effects
What It Is: Art that looks like sparkling geodes or crystals.
- How It’s Done: Use shiny powders and vibrant colors to make resin pieces look like they have real crystals inside. You can even add real gemstone bits.
- Why It’s Cool: The sparkly, shiny look makes art feel magical and luxurious.
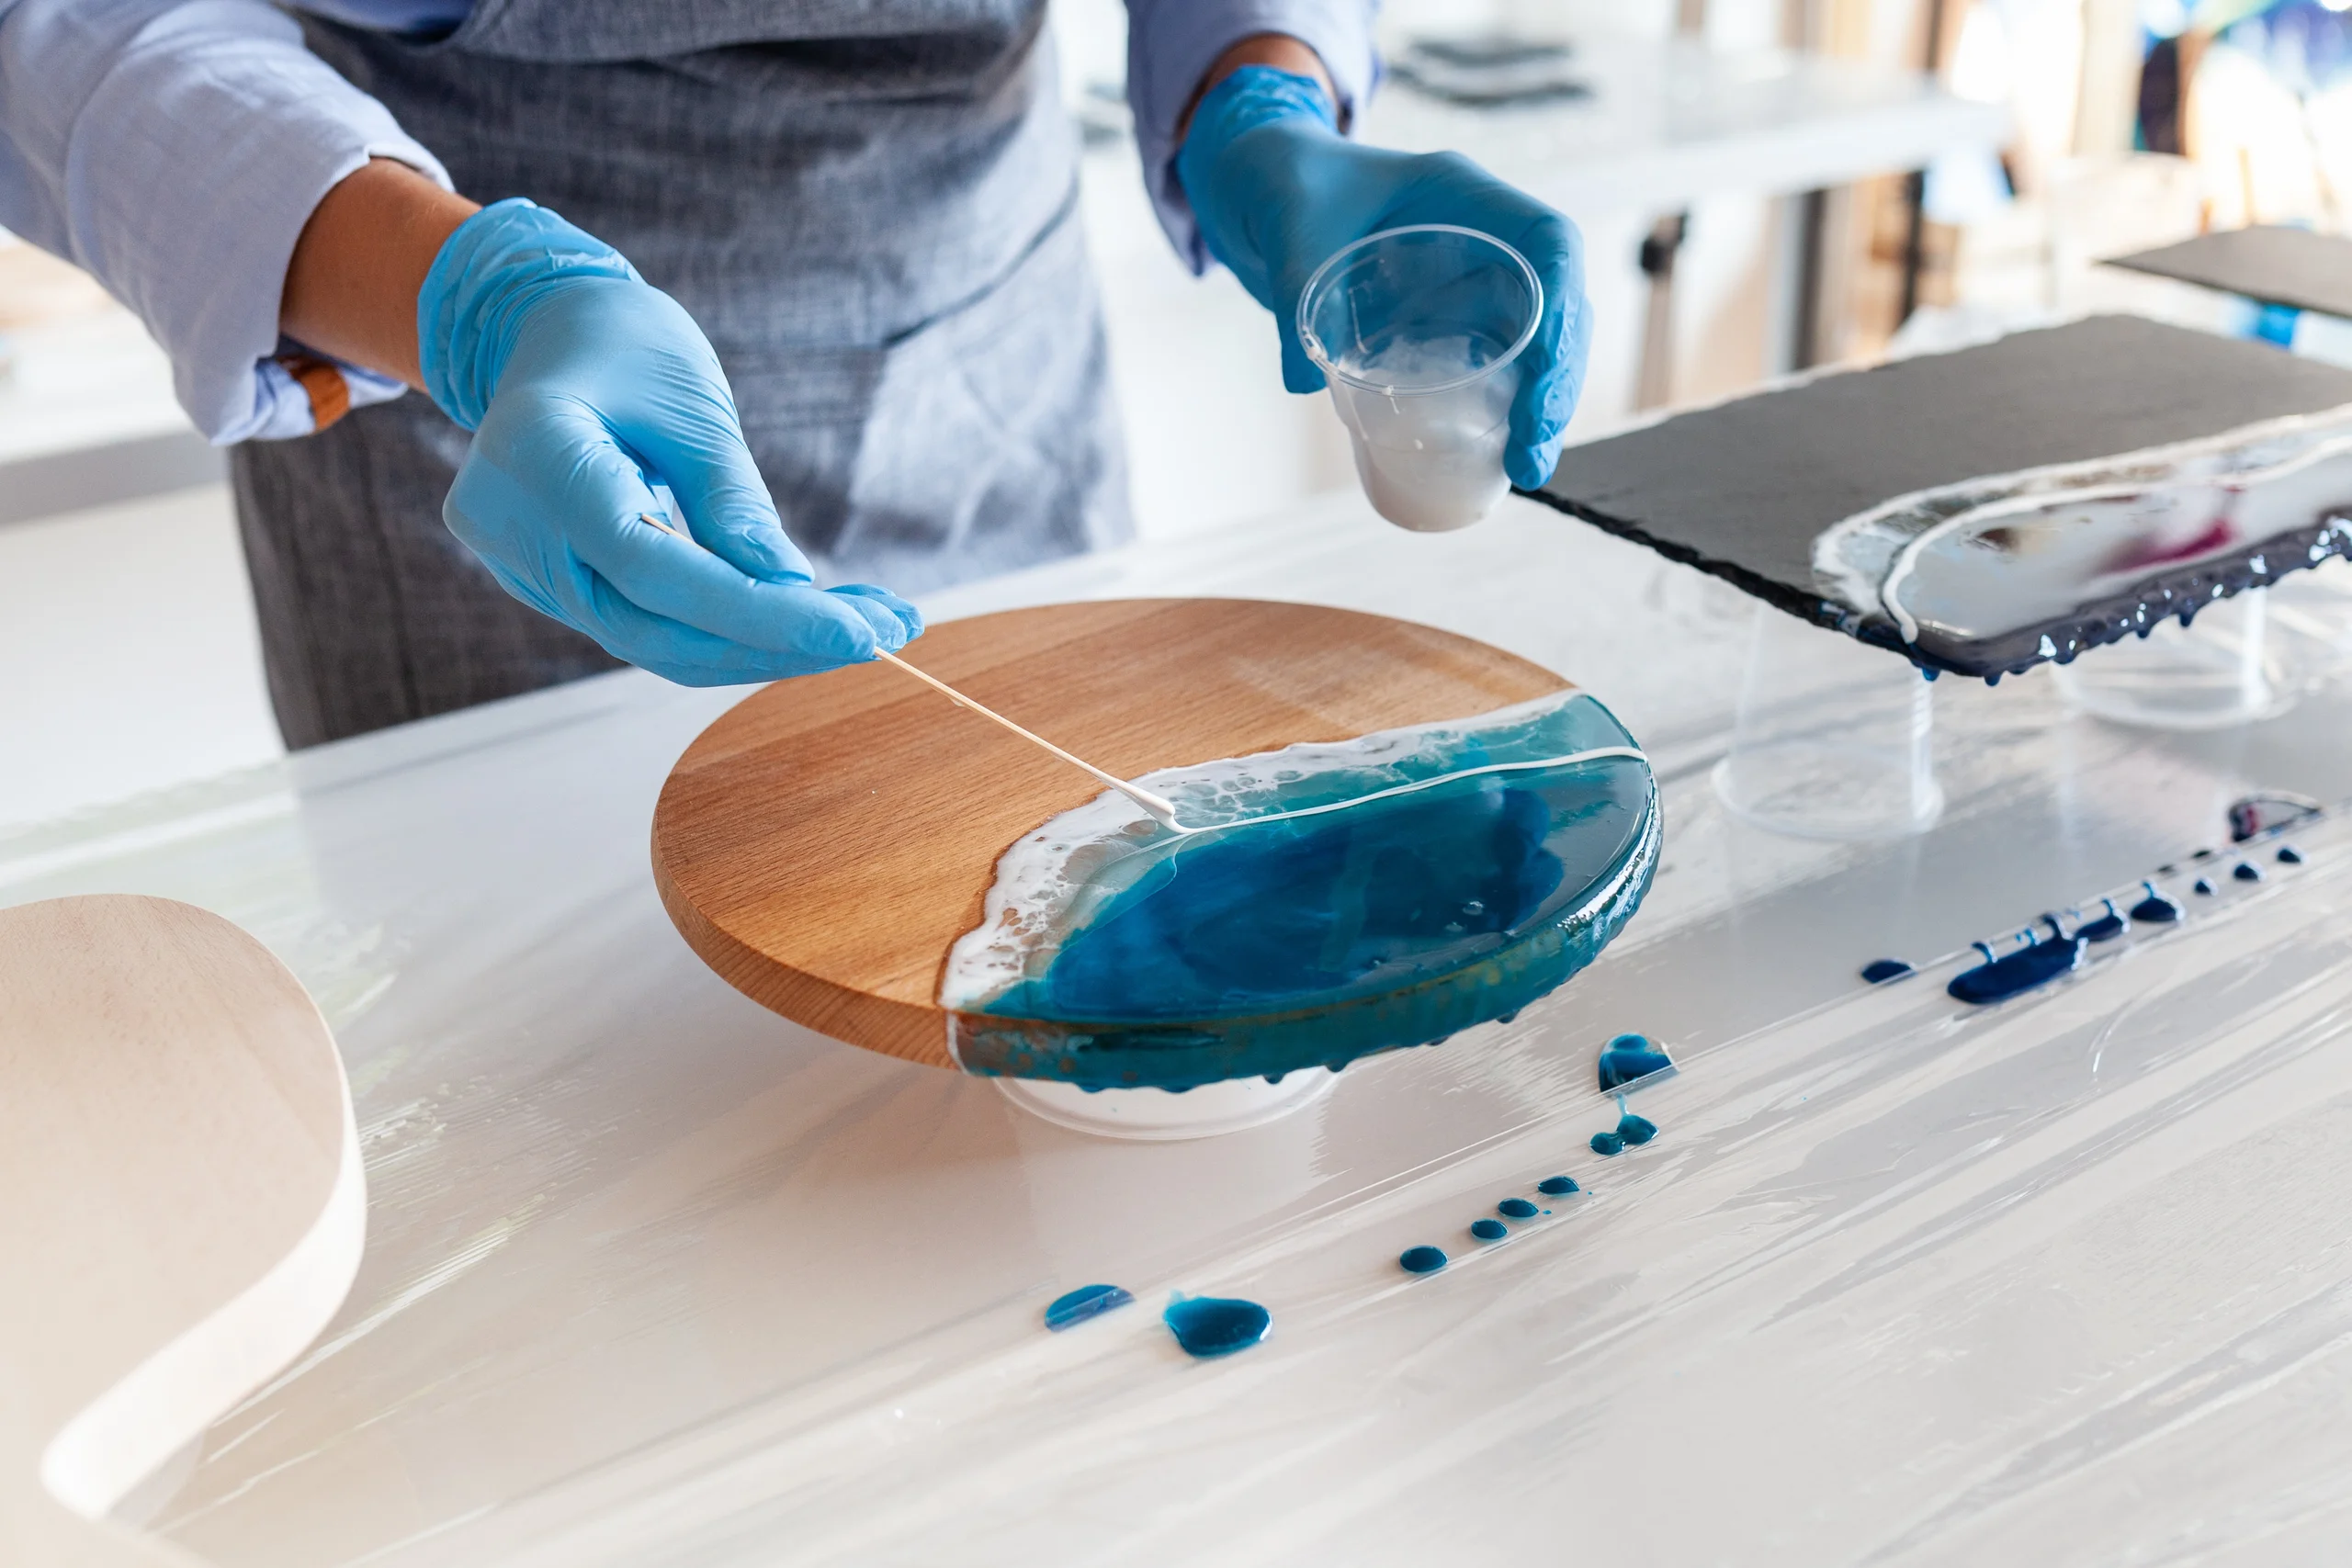
2. Ocean and Beach Scenes
What It Is: Art that captures the beauty of the sea, like waves and sandy beaches.
- How It’s Done: Layer different shades of blue and white resin to mimic water. Add sand and seashells for a beachy feel.
- Why It’s Cool: The calming colors and beach elements make it feel like a day at the shore.
3. Abstract and Fluid Art
What It Is: Art with swirling, flowing patterns that are unique every time.
- How It’s Done: Pour different colors of resin onto a surface and let them mix and swirl in interesting ways. Techniques like “dirty pours” create these abstract patterns.
- Why It’s Cool: Each piece is one-of-a-kind and the patterns are always a surprise.
4. Functional Art
What It Is: Everyday items like coasters and trays that are also beautiful art pieces.
- How It’s Done: Turn useful objects into art by decorating them with resin. You can create custom designs or add colors and textures.
- Why It’s Cool: It combines practical items with artistic design, making everyday things special.
5. Nature-Inspired Resin Art
What It Is: Art that includes real natural elements like flowers and leaves.
- How It’s Done: Embed dried flowers, leaves, or small branches in clear resin to preserve their beauty.
- Why It’s Cool: It brings the beauty of nature into your art and makes each piece unique.
6. Metallic and Glitter Effects
What It Is: Resin art that sparkles with metallic colors and glitter.
- How It’s Done: Mix metallic powders or glitter into the resin to create shiny, reflective surfaces.
- Why It’s Cool: The shimmer and shine add a touch of glamour and make your art pop.
7. Custom and Personalized Art
What It Is: Resin art made to fit personal tastes or themes https://pin.it/5KMe6eBaA


5. Showcasing Resin Art
1. Light It Up
What to Do:
- Spotlights: Use adjustable lights to highlight your art. This makes the shiny surface and colors pop.
- LED Lights: Bright and clean lighting can show off the details without being too harsh.
Why It Helps: Good lighting makes your art look vibrant and brings out its best features.
2. Frame It Right
What to Do:
- Choose a Frame: Pick a frame that suits your art. Simple frames for modern pieces, or more detailed frames for classic looks.
- Floating Frames: These give a cool effect as if your art is floating on the wall.
Why It Helps: A nice frame adds a finishing touch and makes your art stand out even more.
3. Use Stands and Shelves
What to Do:
- Acrylic Stands: Clear stands make your art look like it’s floating, which can be eye-catching.
- Floating Shelves: Use shelves to display multiple pieces at different heights for a gallery look.
Why It Helps: Stands and shelves showcase your art at the right height and make it more noticeable.
4. Create a Theme
What to Do:
- Color Groups: Arrange your art by color for a coordinated look.
- Storytelling: Group pieces that share a theme or mood to create a visual story.
Why It Helps: A themed display makes your art look more organized and interesting.
5. Keep It Clean and Safe
What to Do:
- Display Cases: Use cases to protect your art from dust and damage.
- Minimal Clutter: Keep the area around your art clean to make sure it stands out.
Why It Helps: Protecting and cleaning your display area keeps your art looking great.
6. Set the Right Scene
What to Do:
- Backdrop: Use a background color or texture that complements your art.
- Surroundings: Place your art in a spot that matches its style, like a modern room for contemporary pieces.


6. Learning and Growing as a Resin Artist
1. Master the Basics
What to Do:
- Learn the Basics: Understand how to mix, pour, and cure resin properly.
- Try New Things: Experiment with different colors and molds to find what you like.
Why It Helps: Getting the basics right gives you a strong start and lets you create great art.
2. Find Inspiration
What to Do:
- Explore Art: Look at other resin art online or in galleries for ideas.
- Join Art Groups: Connect with other artists online or locally to share and get ideas.
Why It Helps: Seeing different styles and techniques can inspire your own creativity.
3. Take Classes
What to Do:
- Find Courses: Look for online or local classes that teach resin art.
- Attend Workshops: Participate in hands-on workshops to learn new techniques.
Why It Helps: Classes and workshops provide new skills and insights from experienced artists.
4. Practice Regularly
What to Do:
- Set Aside Time: Make time for resin art in your schedule.
- Try Different Projects: Work on various pieces to improve your skills.
Why It Helps: Regular practice helps you get better and discover your style.
5. Experiment and Innovate
What to Do:
- Use New Materials: Try different pigments and additives in your resin.
- Be Creative: Experiment with new techniques and styles.
Why It Helps: Trying new things keeps your art fresh and exciting.
6. Get Feedback
What to Do:
- Ask for Opinions: Show your work to friends, other artists, or mentors and ask for their thoughts.
- Join Critique Groups: Participate in groups where you can get constructive feedback.
Why It Helps: Feedback helps you improve and see your work from different perspectives.
7. Keep a Portfolio
What to Do:
- Save Your Work: Take photos of your resin art and keep them organized.
- Review Regularly: Look back at your portfolio to see your progress and what you might want to try next.
Why It Helps: A portfolio shows how much you’ve improved and helps you plan your next steps.
8. Stay Updated
What to Do:
- Follow Trends: Keep up with the latest trends and materials in resin art.
- Learn About New Tools: Explore new tools and techniques to keep your work current.


Conclusion
Resin art is an exciting and versatile medium that allows for incredible creativity and expression. Here’s a simplified guide to help you understand and enhance your resin art skills:
1. Unleash Your Creativity with Resin Art
Resin art provides a unique opportunity to experiment with vibrant colors, intricate patterns, and stunning textures. Embrace the freedom to create one-of-a-kind pieces that reflect your personal style.
2. Master the Basics of Resin Art
Start by learning the core techniques: mixing, pouring, and curing resin. These foundational skills are essential for creating high-quality resin art and will give you the confidence to explore advanced methods.
3. Experiment and Innovate
Don’t hesitate to try new colors, materials, and techniques. Experimenting with different approaches can lead to innovative designs and unique effects in your resin art projects.
4. Continuously Learn and Improve
Stay current with the latest trends and techniques in resin art by taking classes, attending workshops, and following industry updates. Ongoing learning helps you refine your skills and stay inspired.
5. Showcase Your Resin Art Effectively
Present your resin art in a way that highlights its best features. Use appropriate lighting, stylish frames, and attractive displays to make your pieces stand out and captivate your audience.
6. Seek Constructive Feedback
Share your work with other artists and enthusiasts to get valuable feedback. Constructive criticism can provide new perspectives and help you enhance your resin art techniques.
7. Enjoy the Creative Process
Remember to enjoy creating resin art. The process is as important as the final product, so celebrate your artistic journey and the joy of making beautiful, unique pieces.